Understanding the mind and method behind one puzzle (referring here also to ciphers and riddles) can pave the way to resolving all associated enigmas. Revisiting all Zodiac communications after the Z340 breakthrough as one coherent structure is particularly justified, as inter-relations, substantial repetition, and a unique style underline Zodiac’s puzzles and some of his seemingly plain letters. Coherence and repetition can facilitate unique solutions even to short ciphers and obscure puzzles. Indeed, any cipher can be uniquely solved given sufficient information on the content or key, especially when the same message repeats several times, and certainly when this repetition spans both ciphers and plain-sight communications. Thanks to their excessive redundancy, all puzzles in Zodiac’s canonical 1970-1974 communications now have a unique, coherent solution (presently neither confirmed nor challenged by others, to my knowledge), as shown in my April-to-June posts summarized here along with new observations. Indeed, all puzzles turn out to convey parts of the same, short, essentially ten-word message:
Zodiac, self-proclaimed Slaves’ Slayer, planted a bomb on Route 84, NNE Fremont, CA.
Precise location: near and possibly aligned with Paradise Drive, in Vallejo Mill, north-northeast of Fremont, on the road arriving from Pleasanton, in the elevated wayside towards the railway tracks; see bomb design and search box.
_____________
Repeating the bomb location at least eight times, independently, the communications also contain many fragments of the above message, some of them quite unambiguous. Conversely, the above short message accounts for all unexplained elements in every single Zodiac puzzle. In particular, the solution explains the 8+4 eyes drawn on a card, an ‘OK’ skeleton gesture, the seemingly sloppy text capitalization and underlines, the VMF symbol, ‘PARADiCE’, ‘Lake Tahoe’, the bizarre ‘SLA’ anecdote, irregular postmarks, and many more. Indeed, challenge me to show how any element in Zodiac’s canonical communications fits in! The symbols that previously led to much speculation and symbolic interpretations are, for the most part, just innocent pieces in rebus puzzles. The cipher solutions are unique and robust on their own accord (p-values are exceedingly small), while seemingly ambiguous interpretations of individual rebus puzzle-pieces are proven correct by repetition and context, as in any scientific theory: weighing its simplicity against the number of elements it explains. The theory is sufficiently robust to prove itself even if some elements are excluded; in particular, the picture remains intact even without the Z13 and Z32 ciphers, although they were instrumental in deriving the theory. Any challenge to the theory is welcome, as indicated at the end of this post.
I focus here on homophonic ciphers Z13 and Z32, the puzzles in the Halloween–communication and in the Sierra postcard, and the concealed, shifted-alphabet cipher in this postcard, but point out how the earlier Z408 and Z340 solutions fit in. Previously unexplained elements in the so-called SLA, LA Times, and Citizen letters are also shown to be evident hints at the same solution. Other confirmed communications do not appear to contain additional puzzles or hints. The 1990 Eureka card does contain puzzles and a concealed cipher (“Femme slave”) conspicuously similar to the Sierra postcard, but is analyzed elsewhere as it lies outside the present scope and is officially unconfirmed to be authentic. The ciphers are technically simple, and could be created and solved after reading only the first few chapters of an introductory book; no need to invoke multiple layers or other ideas that overestimate Zodiac’s amateur abilities. Z13 and Z32 are homophonic ciphers with transpositions and some irregularities, similar to Z340, showing in retrospect a partial reuse of a generalized Z408 key and a relation to the knight-move transpositions of Z340. I found no previous discussions of the concealed cipher in the postcard, although its presence is obvious from the key explicitly provided in the attention line. As one better understands the logic behind Zodiac’s puzzles, additional subtle pieces become apparent, including for example the significance of lower vs. uppercase letters utilized in this key, further justifying a joint analysis.
Knowing their keys renders the concealed ciphers (in both Sierra and Eureka cards) easy and robust, but the homophonic ciphers are difficult due to their short lengths and separate keys and transpositions, especially if the information provided by Zodiac is not fully incorporated. The rebus puzzles are challenging due to the ambiguous nature of their individual pieces, especially if one does not appreciate that each of the four parts of the communication is a stand-alone puzzle with the same solution. Like many amateurs, Zodiac underestimated the difficulty of his homophonic ciphers, so he had to later compensate by providing both subtle and explicit hints (e.g., showing plain text pieces of all Z340, Z13, and Z32), and preparing multiple new puzzles to repeat the above short message. He insisted that his puzzles be challenging yet jointly solvable and verifiable, thanks to their repetitiveness. However, the confusion introduced by the redundancy contributed to multiple symbolistic interpretations that obscured the overall structure, an effect Zodiac probably neither expected nor intended. Some puzzles were specifically designed to facilitate the solutions to the ciphers, but were themselves too difficult to understand before the ciphers were already solved; they are now helpful in proving the solutions correct, even if this was not their original purpose. As Zodiac later provided hints for the content and transpositions of his homophonic ciphers, we again see that it is essential to analyze all his canonical communications jointly.
Unfortunately, the repetition has left the correspondence with less message content than one might have hoped. Zodiac tellingly prioritized the redundancy needed to facilitate and validate the cipher solutions, or independently arrive at the same ultimate message, over new criminal content. In particular, and unlike some previous suggestions, there is no evidence that Zodiac invoked any distractions or misdirections in his puzzle work. All puzzles are constructive, leading to variations on the same message, with no unnecessary or diverging pieces. (Technical concealment, such as the use of homophones, should not be considered as misdirection). The messages were never meant to reveal Zodiac’s identity; assuming otherwise would be illogical, especially after he explicitly clarified this point in Z408. However, some routes to further the investigation are indicated by the solutions, and Zodiac’s puzzle work sheds light on his skills and character. In addition, understanding Zodiac’s methods and thinking can facilitate the solutions to later, unconfirmed puzzles, as already demonstrated with the Eureka card.
Keeping the summary concise, the solutions are presented below with minimal derivation, for basic exposition and verification purposes; links to the full derivations (some with initial missteps) are provided for those interested. The solutions are arranged in a convenient logical, but somewhat arbitrary, order, grouping together strongly interconnected puzzles. Thanks to the redundancy, the overall solution does not depend on any single puzzle element or even a small subset of puzzles, so you can skip the discussion of a piece you don’t like, or order the exposition differently. Indeed, the solutions were originally derived in a different order, roughly following the Zodiac communication timeline, as described in the interim summaries A and B, and in the original threads 1, 2, 3, 4, 5, 6. The most repetitive and straightforward puzzles were obtained only toward the end of Zodiac’s activity, as he grew frustrated that his ciphers remained unsolved and his actions were unappreciated. Hence, in hindsight, it would have been easier to start the analysis with the late communications, and work backward towards the earliest and most challenging piece – Z340 – rather than vice versa.
_____________
Zodiac provided 17 canonical, confirmed letters in two separate periods, as summarized in the table below (references in the caption). Fourteen letters were sent between July 1969 and March 1971, and three additional letters were sent, after a three-year hiatus, between January and May 1974; subsequent letters seem unrelated/authenticity debated/disputed. The bomb Zodiac reported designing and eventually arming against a school bus in 1970 was a central theme in the communications, and most of the letters revolved around this topic. After first raising the idea of killing children, in the October 1969 ‘Stine’ letter, seven consecutive letters explicitly discussed preparing the bomb, arming it, making outlandish demands before activation, and later challenging the police to find and disarm the device. The next communication, in October 1970, was the Halloween card, filled with bomb puzzles including, for example, an obvious “BOOM” (see below). So, it is no surprise that many puzzles and subtle hints unsolved until now also pertain to the bomb; we should have probably anticipated as much. Some of the communications following the Halloween card clearly contain bomb clues, including the Sierra postcard (which focused mainly, and perhaps exclusively, on the bomb), the LA Times letter, and most probably also the much later Citizen postcard (the last of the 17 letters).

Table 1: Summary of Zodiac communications (References: 1, 2, 3, 4, 5). Ciphers are in green italics, bomb references in bold: explicit in red, concealed/implicit in blue.
For example, all traced Zodiac communications were postmarked San-Francisco, except two: the LA Times letter, postmarked Pleasanton in March 1971 (after the Halloween card, and shortly before the Sierra postcard with its bomb puzzles), and the Citizen postcard, reported as postmarked Alameda County in May 1974, three years later. These two unusual postmarks stand out as deliberate clues. Indeed, having identified the bomb location NNE of Fremont, on the Route 84 section connecting Fremont and Pleasanton (see map below), it is evident that Zodiac sent the LA Times letter from Pleasanton to indicate the approximate bomb location. Alameda County includes Fremont, Pleasanton, and other towns as far north as Albany. However, multiple references (for example, in Penn’s book, and here, here, and elsewhere) unequivocally state that the Citizen postcard was sent specifically from Fremont. Sending the card from Fremont renders it an obvious bomb clue, in and of itself, and especially when combined with the Pleasanton clue. Note that the references naming Fremont had no reason to suspect this town, of all places. Also, note that the CA 945 postmark visible on the Citizen envelope does not on its own accord imply neither Fremont, nor Alameda County, as without additional digits, it may also refer to much farther locations; hence, either claim required evidence beyond the envelope.
Assuming that the above references are correct about the Citizen postcard being sent from Fremont, this is one of several examples showing how Zodiac gradually simplified his clues as he grew increasingly frustrated that his puzzles remained unsolved and his actions were unappreciated. Indeed, the combination of this Fremont clue with the details Zodiac provided earlier concerning the bomb design, particularly its alignment and placement on an elevated wayside, could have narrowed the search area sufficiently to find the bomb. So, if we were in the 1970s and only looking for the bomb, we could have ended the discussion here, without solving any cipher or puzzle.
_____________
Before discussing the short homophonic ciphers Z13 and Z32, it is worth reminding that a crucial step in the solution of Z340 was the identification of j=19 jump transpositions, equivalent to right-right-down moves of a chess knight for a block of width w=17. Interestingly, w=17 was also the width used in Z408 and in the first row of Z32; a different prime, w=13, was tellingly chosen for Z13. As discussed here, Zodiac’s choice of j=19 was less convenient than several other, prime and non-prime, alternatives. When combined with tight writing (scytale-like, helpful in avoiding errors in such a long cipher), it forced him to split the cipher into two 9-by-17 blocks, and invent alternative reading rules for the residual, 2-by-17 block of text. Zodiac apparently insisted on chess-knight moves in Z340, despite the enhanced complexity and added labor, but why?
The VMF symbol (sometimes referred to as the ZF symbol or similar alternatives) was drawn both on the envelope (upper left panel in Figure 1 below) and on the card (upper right panel) of the October 1970 Halloween communication. This symbol stands out as the only puzzle piece that Zodiac repeated twice, signaling its importance. Zodiac may have also duplicated the symbol to draw attention to the envelope itself, as an independent rebus puzzle spelling “Vallejo Mill”. (Do you see the puzzle hiding here? The inverted ‘val’ + ‘l’ +…+ ‘Mill’ should be easy, while ‘ejo’ is difficult and discussed later.)
The lines in the VMF symbol can be seen to combine the initials of “Vallejo Mill, Fremont” (see the middle row in the figure), but this is ambiguous and could only be appreciated in hindsight. Notice how the lines vary slightly in angle and length between the two appearances of the symbol (top row), while the dot pattern is kept precisely the same. The distances between the dots were kept equal as if to maintain them on an imaginary coordinate grid, thus indicating the importance of the relative dot positions.

Figure 1: ZMF symbol with the dot pattern on the envelope (upper left panel) and card (upper right). See text for an explanation of the interpretations (lower panels).
This dot arrangement clearly conveys a message, and can be seen to provide the structure of the three ciphers – Z340, Z13, and Z32, and in their correct order of appearance – which by Halloween 1970 already went unsolved for many months. Recognizing that Zodiac insisted on chess-knight moves in Z340, we could have already realized, in principle, that the dots convey the transposition rules of the three ciphers, elegantly and compactly, as indicated by the annotated arrows (bottom row). The meaning of the dots eventually became apparent after Z13 was shown to contain a high-significance message readable only for j=-3 transpositions (three steps left, conveyed by the bottom two dots), and unequivocal after a solution to Z32 was not only uniquely derived with diagonal transpositions (left two dots), but also proved correct by its direct repetition in the Sierra postcard (by the offset between the two crosshairs symbols). Conversely, understanding the ZMF symbol explains why Zodiac insisted on inconvenient chess-knight moves in Z340.
_____________
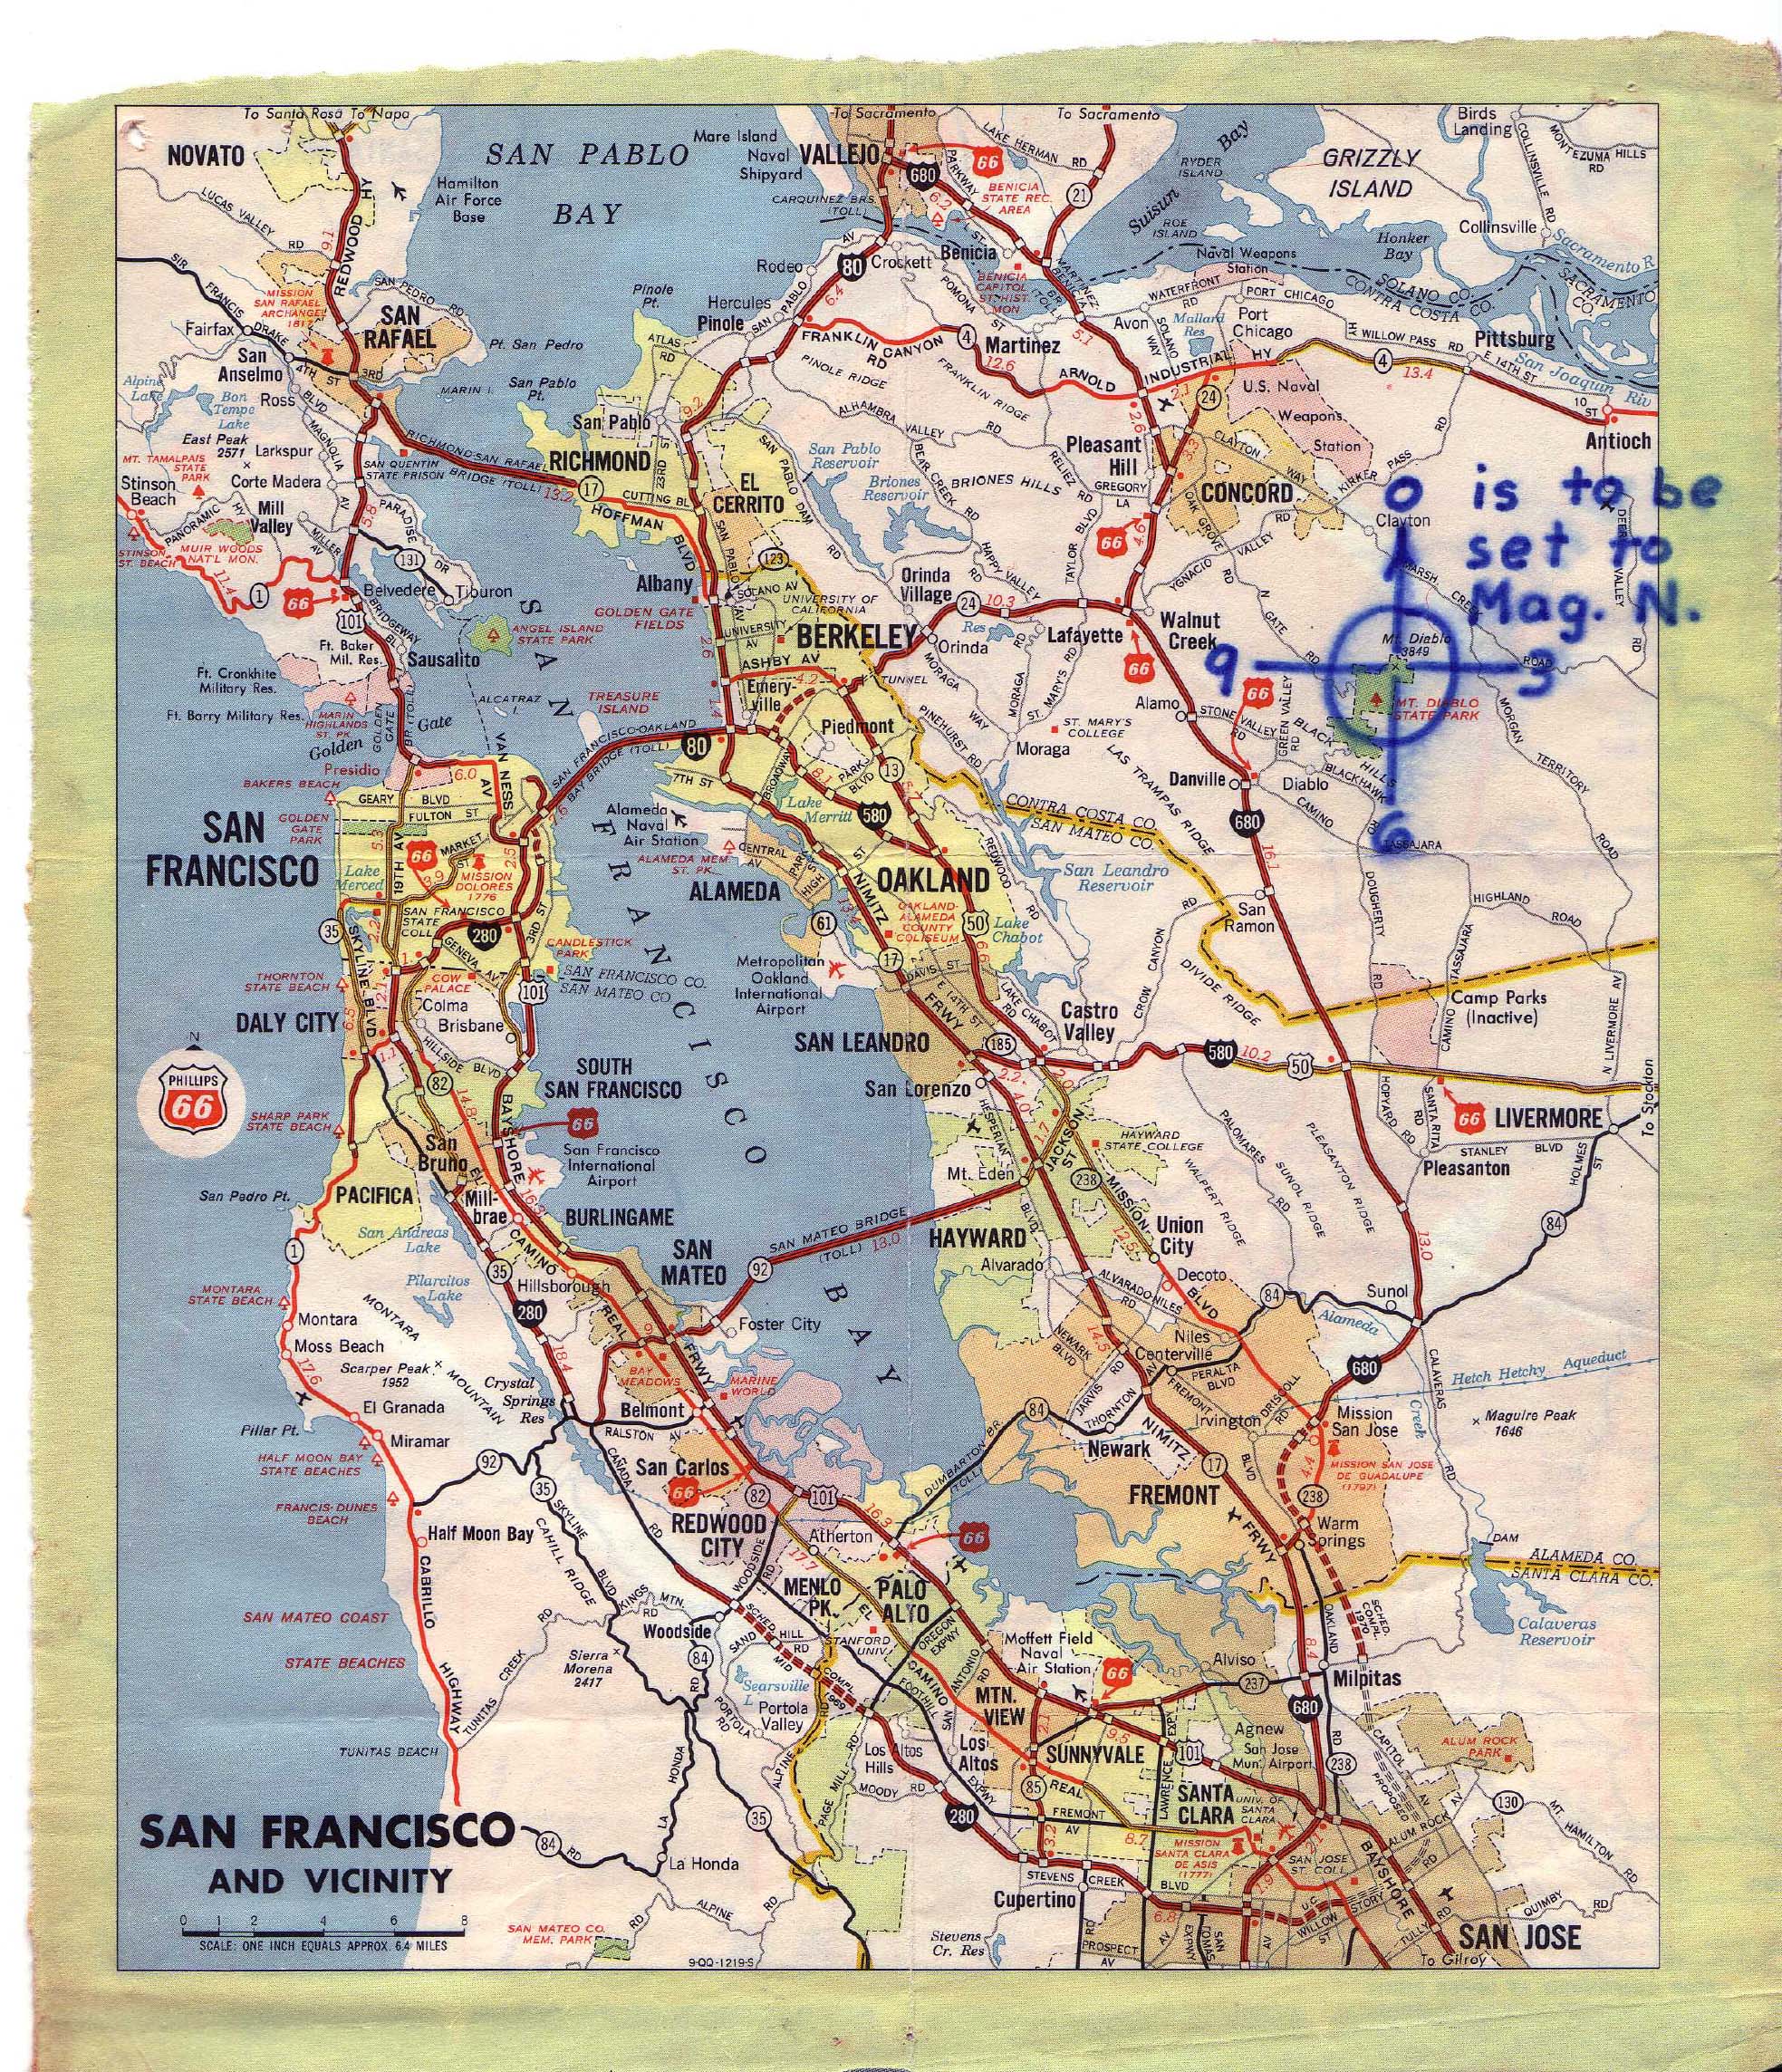
The first message pointing at the precise bomb location was Z32, coupled with the so-called Mount Diablo map. Above the cipher, Zodiac wrote “The map coupled with this code will tell you where the bomb is set. You have untill (sic.) next Fall to dig it up.” On the map he wrote that “0 is to be set to Mag. N.”, and later indicated that “The Mt. Diablo Code concerns Radians &#inches along the radians”. The cipher thus provides polar coordinates in natural units, centered upon Mount Diablo, and aligned with the magnetic north. This choice indeed seems like the easiest and most realistic option available to Zodiac under the circumstances, with two digits being sufficient for specifying the angle. Polar coordinates in natural units are primarily used in math and physics, but are taught in introductory undergraduate courses of most exact sciences and engineering disciplines, and may be found in any introductory text. The term “along the radians” is technically incorrect; one would instead specify ‘along the ray’, ‘bearing’, or ‘heading’; it seems that Zodiac was not a particularly good student.
The constraints inferred from Zodiac’s clues on the message and on the (diagonal) transpositions were sufficiently constraining to yield a unique solution,
“east 3.0 rad 3.3” (inch),
pointing at the Route 84 location near Paradise Drive, Fremont (see Figures 2 and 3 for the cipher solution and its geographic implication). Folding in the available information on the content and key yields a unique solution despite the very few cipher multiplicities (shaded symbols in Figure 2), which were already suspected earlier to reflect multiple appearances of the word “three” with its highly homophonic letters. Incidentally, the rare multiplicities render the solution robust to incongruent letter or word inversions, and even to a range of possible Zodiac mistakes. The solution is unique also in terms of its geographic and cryptanalytic attributes (see therein).
The diagonal transpositions were inferred, independently of the solution, based on the VMF symbol and the cipher’s peculiar, 17+15 symbol structure. As the analysis approximately followed the communication timeline, Z32 was solved after its transpositions were established, and before the bomb location was inferred from other puzzles outlined below. However, the message turned out to be in partial depth with respect to a generalized Z408 key, and so could have been uniquely derived even without prior knowledge of the diagonal transpositions.

Figure 2: Z32 solution, “east 3.0 rad 3.3” (inch), uniquely derived from Zodiac’s clues on the message content.
Zodiac apparently lost his patience as Z32 remained unsolved despite subsequent clues on its content and transpositions. So, he provided the very same message in a much more transparent way, with no cipher, in the Sierra postcard. Therefore, if you dislike ciphers, or suspect the above Z32 solution for some reason, then we can now manage without Z32. Moreover, Zodiac provided not one but two independent puzzles for the bomb location on this postcard, by also including a thinly concealed cipher. Hence, you can choose to consider only one of the postcard puzzles, or even skip the postcard altogether and proceed to the rebus puzzles on the Halloween card, without losing the underlying message.
The postcard’s front (picture side) shows a crosshairs symbol in its bottom right corner, and a hole near the upper right corner; this hole is actually the central part of a crosshairs symbol drawn on the other (address) side of the postcard. There is evidence that Zodiac carefully measured the positions of the two symbols, and people have postulated that the angle between them is meaningful. Indeed, the angle of the bottom symbol with respect to the hole is 173 degrees clockwise, i.e., precisely 3.0 radians east, just as in the Z32 message. The distance between the two symbols is 3.3 inches, thus fully reproducing Z32, provided that the postcard is scaled to standard, 5-by-7 inch size, or equivalently, that the printed stamp is scaled to standard, 1.2-by-0.9 inch size.
Hence, the crosshairs symbols provide precisely the same Z32 solution derived earlier:
“east 3.0 rad 3.3” (inch).
Figure 3 below shows the identical solution (green line) of Z32 and the Sierra card, pointing at the location given by the bottom crosshairs symbol. Notably, nothing in this figure is now arbitrary; in particular, the 16-degree tilt of the postcard is fixed by the 1970 magnetic declination, as indicated by Zodiac. The agreement between Z32 and the postcard narrows down the bomb location and corroborates both the postcard interpretation and the cipher solution.

Figure 3: Overlaid solutions (green line and crosshairs symbol) to Z32 and the crosshairs puzzle on the Sierra postcard. Both solutions, independently, point at Route 84 near Paradise Drive, Fremont. The 16-degree tilt of the postcard is fixed by the 1970 magnetic declination, as indicated by Zodiac.
The identified spot precisely matches the bomb location described in Zodiac’s designs. This agreement provides yet more support that the location is correct, and indicates that the site was indeed chosen for a bomb. In particular, the nearby sharply elevated wayside of a central road in the periphery of a town is quite rare. Interestingly, even before Z32 was solved, the location was suspected as being south of Mount Diablo (based on “by KᴎiFE” in the Halloween card) or near a “Paradise Drive” (based on repeated “Paradice”, sic., references), which could have been combined to lead to the NNE Fremont location. Such circumstantial evidence is no longer needed, given the redundant and robust solutions for the bomb location outlined above and below.
_____________
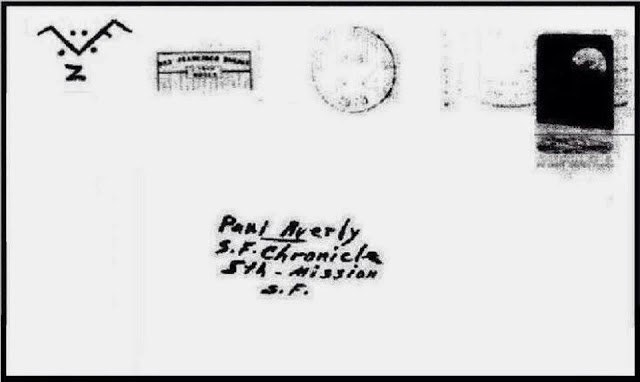
An experienced cryptanalyst or old-time censor should easily detect the likely presence of a concealed cipher in the Sierra postcard, simply by noticing the awkward choice of words, their unnatural arrangement and length pattern, irregularities in letter capitalization, etc. In the postcard case, the presence of a concealed cipher is made quite evident by the backside (with the address; see Figure 4 below), where an equality sign and other anomalies in the attention line transformed it into the ten-symbol alphabet key “Paulaverly=ChronicLke”.

Figure 4: Back (address) side of the Sierra postcard. Zodiac transformed the attention line into an obvious (shifted-alphabet) key.
Zodiac already added once before a redundant “l” to Paul Avery’s name, in the Halloween card envelope, and used it as part of the aforementioned rebus puzzle. Here, he repeated the trick, now using Avery’s name as part of the key, with the redundant “l” extending the key to ten symbols, intended for a corresponding ten-symbol message hiding on the front of the postcard. To complete the key, Zodiac also had to add a redundant “k” to “Chronicle” on the right-hand side, which in turn forced him to capitalize its “L”. He utilized uppercase vs. lowercase letters in several puzzles; unlike the Halloween envelope, here he kept the “a” in “averly” deliberately lowercase to further indicate that the attention line is indeed a key. All these anomalies were noticed earlier but could not be explained, so this interpretation of the attention line as an alphabet key seems unequivocal.
This kind of alphabet equality key is characteristic of classical shifted-alphabet ciphers, discussed in many introductory books, and used in espionage at least till the 1960s. The initials of the subsequent text usually form the coded message. Here, the first key letter, “P=C”, translates the initial {p,q,r,…} of the first text word into {c,d,e,…} (respectively and cyclically); the second key letter, “a=h”, similarly translates the initial of the second word, and so on. An additional small shift s is sometimes introduced; for example, an s=1 shift would effectively replace “Paul…” in the key by “Qbvm…”. The shift s can be changed mid-sentence, especially if signaled by a code word or a number.
While the key is evident, there is some – but not much – ambiguity in the selection and (meaningful) order of the words whose initials form the actual message. Unlike homophonic ciphers, the key here is fixed, so the ambiguity is negligible because any incorrect choice would yield gibberish. The number 12 on the postcard was previously interpreted as a wrong victim count, causing some speculation and even doubts about the postcard authenticity. However, acknowledging the presence of a concealed cipher, it is more natural to interpret 12 as a hint on s, most likely switching from s=1 to s=2 or vice versa (a large, s=12 shift is also possible, although less convenient). Now, what is the correct selection + order of words from the postcard?

Figure 5: Front (image) side of the Sierra postcard. The word selection and shift indicator are highlighted in color.
The bottom-right postcard text (see Figure 5 above), “pass LAKE TAHOE areas”, sounds conspicuously unnatural and very likely to end the message, whereas the preceding C in “viCtim” was capitalized to draw attention (again: typical of Zodiac), so together we have (…,c,p,l,t,a). With the easiest nontrivial, s=1 shift, this yields the cipher ending “… omerf”. However, Zodiac used word reversals in several puzzles (for example, a few times in Z340; also see the Halloween card discussion below). Indeed, “around in the snow” written upside-down in this postcard may indicate a similar inversion here. If the message is inverted, such that the end of the postcard is the first part of the message, we get a familiar “Fremo…”.
Where does the message begin? We need five additional ordered words, and their choice is more ambiguous than the ending words of the postcard. But again: a wrong choice will give gibberish, as we cannot change the key. “Peek through the pines” is in quotations, so probably unrelated (see its discussion below). Starting at “around” (the first word one sees when flipping the card) is elegant, as it suggests a reading order: “in the snow Sierra Club”. The resulting gibberish indicates that Zodiac played ‘around’, and we actually need “the in snow Sierra Club”. Translating the resulting (t,i,s,s,c,c,p,l,t,a) with s=2 changing to s=1 mid-sentence as indicated by “12” on the bottom line, gives
“Fremont NNE”,
inverted, pointing at the bomb location we already know is north-northeast of Fremont.
The selection of words and s values leading to the above message may seem too forced if you never worked on such fixed-key ciphers. In such a case, try to generate other meaningful messages by changing the reading order and varying s: you will generally fail to form anything beyond an unrelated three-letter word, and even that is not so easy without multiple arbitrary s changes. The above choices are constrained by “around” and “12”, interpreted as control words, and include only one letter swap, consistent with other Zodiac puzzles and ciphers. Such a selection is entirely different from ambiguous puzzles such as anagrams, in which there are no control words and no constraints on letter swaps, raising the ambiguity exponentially. Furthermore, a letter swap in this cipher would change not only the order, but also the letters themselves, as the alignment with the fixed key is crucial. In conclusion, the “Fermont NNE” message cannot be coincidental.
Interestingly, Zodiac used a strikingly similar concealed alphabet cipher in the (officially unconfirmed) 1990 Eureka card, to spell “Femme slave”. There too, he used a 10-symbol key in plain sight, for a 10-letter message encoded in the initials of plain-text words. In both cases, he used an alphabet shift s that changes its value after five letters, in the middle of the sentence. And in both cases, the final message is reversed. These remarkable similarities indicate that the same person undoubtedly wrote the Sierra and Eureka cards, and that our solutions to both concealed ciphers are correct.
_____________
There has been much speculation on the plain-text elements in the Sierra postcard, their relation to Lake Tahoe, the meaning of “Sierra Club”, etc. In the absence of repetition or other information, the interpretation of individual puzzle elements is highly ambiguous. For example, consider the phrase “peek through the pines”, given in quotations, which is not used as part of the concealed cipher. Along with the original “Forest pines at incline” ad, which Zodiac used for the postcard image, these may be instructions for finding the failed bomb among trees on the wayside. However, this is just one of many possible interpretations.
The situation is even less clear for the words used in the concealed cipher. Such filler words are often meaningless or even used as misdirections. Zodiac probably preferred relevant words here, as effective concealment or a distraction were not his goals. Nevertheless, his choice of filler words was heavily constrained by the cipher. For example, “LAKE TAHOE” was often interpreted as indicating some criminal activity around the lake, but Zodiac had no choice but to end the postcard with a phrase of initials {p,l,t,a}. The phrase he picked, “pass LAKE TAHOE areas”, may thus have nothing to do with the lake region.
Notice that the filler words may well pertain to Fremont, although, like alternative theories proposed in the past, such an interpretation is quite speculative. Indeed, John C. Frémont, who had a long history with Lincoln (see stamp), is known as the first to ‘discover’ Lake Tahoe, on Valentine’s day 1844, after managing to find a pass across the snowy Sierra Nevada. The lake was even called ‘Lake Fremont’ for a time, in his honor. Zodiac may have consulted some historical text when looking for clues to signal the bomb location in Fremont, CA – the largest among several towns that bear Frémont’s name. The likelihood of an association increases as it explains more elements, so this interpretation, while highly uncertain, nevertheless seems more likely than previous explanations found online.
Incidentally, is it possible that the two Valentine stickers, mentioned online as ‘apparently’ arriving with the Halloween card, actually arrived with the non-postmarked Sierra card? That would strengthen the above association with Fremont, and finally provide a logical explanation for Zodiac sending those stickers.
_____________
The Halloween card was densely packed with puzzles and clues, mainly conveying the bomb location, but also (like the dots of the ZMF symbol) attempting to facilitate the solutions of the earlier three ciphers Z340, Z13, and Z32. Many of the symbols and text on the card are just pieces of four independent rebus puzzles, each spelling the exact same “Vallejo Mill” message on a separate page, pinpointing the bomb NNE of Fremont. Zodiac apparently understood that eventually, repeated puzzles would be easier to solve and prove correct. He probably did not realize that the high density of puzzle elements actually rendered the card temporarily more confusing, and gave rise to multiple symbolistic theories.
The Halloween communication had four separate parts:
- Envelope (including “sorry no cipher”),
- Front (Zodiac added a carefully aligned pumpkin),
- Inside (added 8+4 eyes), and
- Back (wrote “By FiRE” etc.).
Each part conveys the same ‘Vall’+‘ejo’+‘Mill’ message, independently. The interpretation of each single puzzle element is inevitably ambiguous, so the four-fold redundancy was quite necessary. In each of the four parts, ‘Val’ was provided as a letter game or an OK gesture (‘Vale’ in Spanish), ‘ejo’ as a reference to an eye (‘ojo’ in Spanish) with an ‘o’→’e’ indication, and ‘Mill’ as either a symbolic reference or just the letters M+il+L. Zodiac also provided rather obvious hints for (Route) 84, Paradise (Drive), and BOOM, along with more ambiguous clues for the bomb location.
The theory is strengthened and can be proven beyond a given threshold, as usual, by weighing its simplicity against the number of elements it explains and the assumptions it makes. Moreover, demonstrating a four-fold redundancy, where the same puzzle is repeated separately in each part of the communication, dramatically boosts the confidence in the solution. Such repetition is much more powerful than combining clues scattered randomly throughout the communication, and offsets much of the unavoidable ambiguity inherent to the interpretation of each individual element. One can always claim that some puzzle pieces match the theory only by chance, but such a claim becomes increasingly unlikely and eventually ridiculous as the number of such pieces increases and the overall p-value diminishes. The theory requires one plausible assumption: Zodiac knew that in Spanish, ‘eye’ is ‘ojo’, and (less importantly) that ‘OK’ is ‘Vale’. Without this assumption, you would repeatedly get “Valleyo Mill”.
The puzzles are somewhat convoluted, but as far as rebus puzzles go – I’ve seen worse. One should consider that Zodiac went out of his way to produce four entirely different rebus puzzles with the exact same solution, using only Halloween theme elements – not an easy task! The use of some Spanish words was by no means unusual for California in 1970. Moreover, the use of ‘ojo’ seems almost inevitable, as ‘Vallejo’ in the repeated solution is a very challenging word to convey symbolically using English only. Indeed, what symbolic elements would you create for ‘Vallejo’ in a rebus puzzle, if you really had to? And what if, in addition, you could only use Halloween theme elements?… Although some pieces are obscure, other puzzles are solid, in the sense that their interpretation is not too ambiguous.
For example, why did Zodiac write “PEEK-A-BOO” and “YOU ARE DOOMED!” in such a strange way (see Figure 6), wrapping the text around the eye symbol that came with the purchased card? Why did he close the loop on the M, specifically? And why does this M seem to be inverted? A deliberate effort by Zodiac to create the word “BOOM” resolves all three questions simultaneously. Hence, this interpretation is much more likely than any alternative theory, even before taking into account the bomb theme of all seven letters preceding the card.

Figure 6: BOOM element inside the Halloween card (left), also shown inverted (right). (Modified reproduction, henceforth; see text.)
Conversely, once the “BOOM” explanation is accepted, it strengthens the suspicion that the entire Halloween communication focused on the bomb. And once you see the “BOOM” (also shown inverted in the figure), it is difficult to unsee it… Of course, it is impossible to precisely and rigorously prove that Zodiac created this “BOOM” on purpose rather than by mere chance. But such a putative coincidence becomes increasingly unlikely considering the simple elegance of the effect, the above questions remaining unanswered if it was not intentional, and additional information on the repetitive bomb theme in Zodiac’s correspondence. In addition, the Halloween puzzles give away a certain Zodiac style, with an affinity to double- and even triple-meanings of individual puzzle pieces. These considerations apply similarly to the other puzzles discussed below.
As another example, people have wondered and speculated on why inside the card, Zodiac added eight eyes on the tree and four eyes to the right of the tree (see Figure 7 below). He also made the eyes on the tree small, apparently to indicate two separate populations, implying 8+4 but not 12. It is easy to invoke numerological and symbolic explanations, but these are inevitably complicated, ambiguous, and make strong assumptions about Zodiac’s interests. Now we have a much simpler explanation: Zodiac signaled 8 and 4 to indicate Route 84. This solution is more robust and much less ambiguous, even before we knew from Z32 and the Sierra card that a section of this road was the bomb target.

Figure 7: Zodiac added 8+4 eyes to the inside of the Halloween card.
In retrospect, we could have thus solved the Halloween communication independently, even without Z32 and the Sierra card: a Vallejo Mill bomb is the only simple theory that directly explains all Halloween clues, whereas alternative theories had to invoke multiple piecewise explanations, rely heavily on symbolism, and ultimately fail to notice or explain some elements. The theory even exposes previously overlooked hints. For example, few have noticed that among the 11 letters Zodiac sent to the SF Chronicle during his 1969-1971 activity, only the Halloween envelope included the second address line, “5th – MiSSiON”. (The full address was used again in the 1974 Citizen card and much later, in 1990, as part of the concealed cipher in the Eureka card.) I only noticed this unusual address after realizing that to form a fully independent rebus puzzle for “Vallejo Mill”, the envelope had to somehow convey “eye” (for ‘ojo’).
Next, I outline the rebus puzzles appearing in each of the four parts of the Halloween communication, separately. Images in this Halloween-card discussion use a high-resolution reproduction (found here), except where its imperfections are misleading. I moved a few elements around to avoid confusion with unrelated hints or taunts, but was careful not to distort or introduce any new meaning without saying so. I indicate here and below a few Zodiac clues, some of them quite clever, without much detail, as it might be more convincing if you find them yourself.
_____________
The front of the card is straightforward. With a minor modification, introduced in Figure 8 below, it should be an easy-level puzzle for people familiar with the region, especially if they have some experience with this kind of rebus puzzle:

Figure 8: Front of the Halloween card.
Do you see the “Vallejo Mill” in the above figure? The ‘OK’ hand gesture of the skeleton is ‘Vale’ in Spanish. The eyes were colored orange for emphasis, giving ‘ojo’, but ‘o’→‘e’ in one eye gives ‘ejo’. Zodiac carefully placed the pumpkin on the skeleton, and I added its slow roll to make the ‘mill’ clue more apparent. Combined, then, we obtain “Valejo Mill”. In a rebus puzzle, one can surely manage without one of the two ‘l’s in “Vallejo”. However, Zodiac apparently did include a second ‘l’: while the skeleton’s hand gives a ‘Vale’ gesture, its arm is shaped like an ‘L’. As in other puzzle elements, it is difficult to prove that this ‘L’ was deliberate without repetition. But there actually is repetition here: Zodiac also used the posture of the second skeleton, inside the card, to convey letters, and in a more obvious way than on the front of the card. Again, repetition strengthens both interpretations.
You may dislike this puzzle, especially the pumpkin as a ‘mill’ reference. Indeed, each of the four versions of the puzzle conveys its three puzzle elements in different levels of elegance. For example, the ‘mill’ is best represented, in my opinion, in its envelope version, but ‘ejo’ there seems more obscure. However, the added pumpkin roll is less forced and arbitrary than it might seem. Before understanding what Zodiac meant here, we already knew that the careful placement of the pumpkin was not coincidental: the positioning is symmetric and precisely aligned with the skeleton’s sternum, as if to facilitate rolling. Furthermore, similar skeleton cards explicitly said “shake, rattle and roll”, so while hinting at a roll was ingenious, Zodiac may have naturally arrived at the idea when choosing a card.
The inside of the card is less obvious, but still seems solvable as a medium-high difficulty puzzle when mildly rearranged. Do you see “Vallejo Mill” in Figure 9 below? Pay attention to individual letters:

Figure 9: Inside of the Halloween card.
The skeleton’s arms are shaped like a ‘V’. Its body and legs form an ‘L’ or maybe two ‘L’s (one for each leg). The skeleton was carefully positioned above the preexisting text: its head was placed with letters ‘il’ to its left and an ‘a’ (carved up from the original ‘g’) to its right. Zodiac highlighted the aforementioned ‘M’ on the left by inversion + text intersection + “BOOM”, so I took the liberty of moving and circling it to render the puzzle easier. All these letters are used: ‘V’+’a’+’L’+’L’ (top left to bottom right) yield ‘Vall’ for ‘Vallejo’, whereas ‘M’+‘il’+‘L’ (left to right) give ‘Mill’. Eyes are again highlighted in color, so we already have “Vallojo Mill” and are almost done. Zodiac now needed a way to indicate an ‘o’ changing to an ‘e’. He found an interesting, albeit rather convoluted, way to do so: combining words containing ‘OO’ with words containing ‘EE’. Thus, he added ‘PEEK-A-BOO’. He also wrote ‘BOO!’ next to ‘TEEN’. Finally, we again obtain “Vallejo Mill”. In this version of the puzzle, the ‘o’→‘e’ piece seems the least elegant to me, but maybe you like it or see something I’m missing.
The ‘Vall’ is most apparent on the envelope. Here, Zodiac simply underlined “l Av” in “Paul Averly”. In a possible attempt to also indicate the inversion from ‘lav’ to ‘val’, he inverted an N (on the back of the envelope) and an M (inside the card), but we already know how much he liked word inversions, thanks to the Z340, Sierra, and Eureka solutions. The redundant ‘l’ added to Avery stands out, so here we have ‘Val’+‘l’ for correctly spelling the first half of “Vallejo”. Next, consider the “sorry no cipher” note added to the envelope, also shown in Figure 10 below. The two text lines are perpendicular to each other, but the entire structure is at an angle, conveying some message beyond the text itself. What did Zodiac try to symbolize by this structure? I think it is a rather elegant reference to a wind mill, so we have “Vall … Mill”.

Figure 10: Envelope of Halloween card. (Click here for a larger version.)
We expect the envelope to also contain a reference to ‘eye’ and some indication for an ‘o’→‘e’ replacement. The ‘eye’ clue was already hinted above, so I will not spoil the fun; click the figure for a better version of the envelope. There are also one or even two subtle hints therein for replacing an ‘o’ with an ‘e’. Do you see these additional clues? All combined, here we have ‘Val’+‘l’+‘ejo’+‘Mill’, for a correctly spelled “Vallejo Mill”.
Finally, consider the back of the card, shown in Figure 11 below. The letters ‘LAV’ are again emphasized, in resemblance of the underlined ‘lav’ on the envelope. Instead of underlining, here Zodiac accentuated these letters by their central positioning, bracketed by the vertical columns of text to the left and right. The inverted N in “KᴎiFE” seems to play several roles, including an indication of text inversions, a possible geographic reference, and more; in particular, it justifies ‘LAV’→’Val’ if we didn’t already know about word inversions. If you caught the ‘eye’ reference on the envelope, then the same hint should be even more apparent here, and there may be a second ‘eye’ reference, too:

Figure 11: Backside of Halloween card. (Click here for a larger version.)
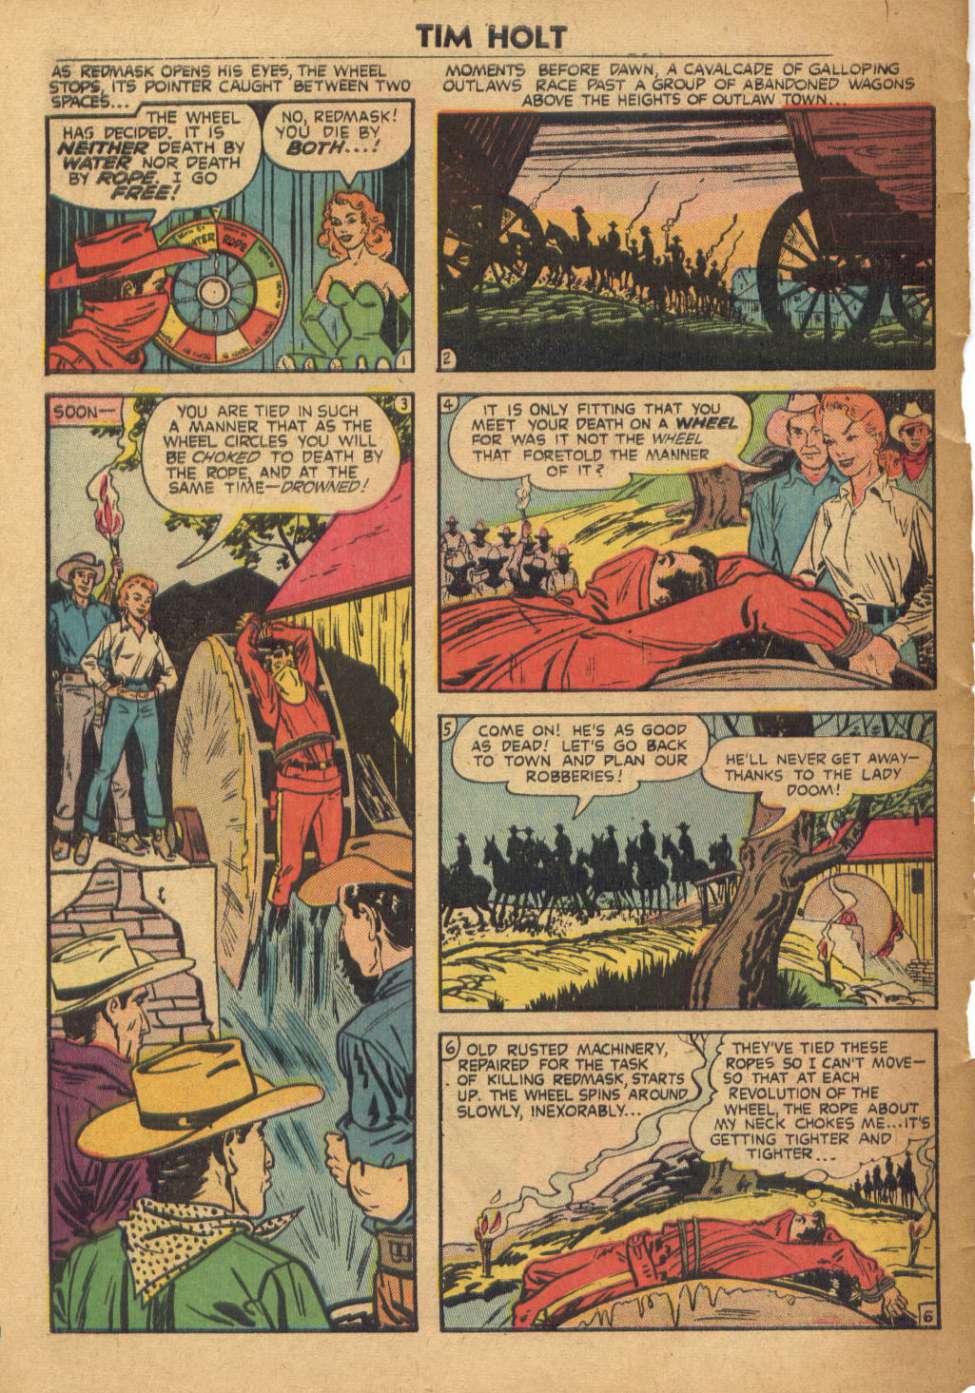
There is at least one ‘o’→’e’ hint here, which I leave for you to find. The most challenging puzzle piece on the backside is, in my opinion, the mill. But many have pointed out that the text appears to reference the Tim Holt #30 comics, in which case a mill is obvious because the wheel on the cover plays a central role, and is later explicitly associated with a water mill, depicted in the plot climax. Then we have ‘VAL’+‘ejo’+‘Mill’ and end up with “Vallejo Mill” for the fourth time”. The comics reference is strengthened by additional possible (individually low confidence) associations: Canyon pass in the comics as the real Canyon road, ‘red mask’ in the comics as the colored mask on the skeleton, Lady doom in the comics possibly related to “DOOMED”, etc. If you reject the comics reference, then the backside is the only one out of the four communication parts where I can’t explain the mill, but then the text may reference the Fremont seal.
In summary, each of the four parts of the Halloween communication presents “Vallejo Mill” as a different rebus puzzle. Recognizing this repetition, the overall solution becomes robust and of negligible ambiguity, and we don’t even need any of the previous communications to pinpoint the bomb. Some puzzle pieces are better than others. In my opinion, some are very good, given the constraints. These pieces demonstrate an impressive skill by Zodiac, especially where he loaded a single puzzle piece with several different roles. But the quality and ambiguity of an individual puzzle are subjective: the same puzzle solution presented to a few people left some convinced and others skeptical. Forum readers surely are, and should be, on the skeptical side. But again: if you think that all four puzzles are too ambiguous, consider them as one combined structure. And if this structure still seems obscure, I challenge you to invent a better English rebus puzzle for “Vallejo Mill”, using Halloween-theme elements only.
In addition to “Vallejo Mill”, we already discussed the clues in the VMF symbol, “BOOM” and (Route) “84”. The word “PARADiCE” (sic.) on the back of the card was not really needed: everyone knows which slaves Zodiac was referring to; also, ‘afterlife slaves’ would have been more reasonable. Indeed, “PARADiCE” seems like a reference to Paradise Drive, and as mentioned above, this word was sufficient for people to suspect a bomb near one of the Paradise Drives in the Mount Diablo map. Possible other, lower significance clues are discussed here. Some elements on the card do not appear to be clues. For example, the number 14, written on a skeleton hand and implied by “4-TEEN”, seems to be a body count.
_____________
One of the most repetitive topics in Zodiac’s communications, second only to the bomb, was his afterlife slaves, which he rambled about in plain letters, puzzles, and ciphers. In February 1974, just before the last canonical, Citizen, communication, he sent the bizarre, so-called SLA letter, stating only that “Did you know that the initials SLAY (Symbionese Liberation Army) spell ‘sla,’ an old Norse word meaning ‘kill’.” (Refer to the original letter, as a reproduction/degraded copy lost the Y in “SLAY”.) Zodiac made unexpected references before, to movies and opera, but in the context of a longer letter and to either make a tongue-in-cheek point (‘The Exorcist’ is comic, ‘Badlands’ glorifies violence) or combine with his ramblings (with the Mikado) or provide a cipher clue (see discussion here and below). The SLA reference is particularly out of context, with no added content, and reads like yet another cipher clue – but for which cipher? And if this is not a bomb reference, could it have anything to do with slaves?
After the Z340 solution indicated that Z13 and Z32 are likely to be homophonic ciphers with fixed but slightly irregular transpositions, containing some actual message, it became worthwhile to explore methods optimized for solving such short ciphers. Z13 and Z32 lie on opposite extremes of the homophonic spectrum: a very high multiplicity rate in Z13, and a very low rate in Z32. It seems that Zodiac purposely made Z13 easier by using fewer homophones, but made no such effort for Z32, where a low multiplicity rate is associated with an abundance of high-frequency letters such as ‘e’ and ‘t’. Therefore, Z13 seemed more amenable to standard decryption methods. The w=13 length of the cipher, being a prime number, suggested that the message was padded by one or two letters to allow for fixed jump transpositions j. (At the time, I suspected j to be a small negative prime, for reasons like the choice of j=19 in Z340 that later turned out to be irrelevant.)
Thanks to its many symbol multiplicities, an old method for solving short ciphers from a source of repetitive messages or limited vocabulary worked well on Z13. The idea is to limit the message to words drawn exclusively from a dictionary compiled from previous communications; possible generalizations include additional constraints/weights imposed on the word likelihood, text template, etc. Thus constraining the vocabulary turned out to be sufficient for identifying one unique and very high-probability (if deranged) solution: “Slaves’ Slayer”. This solution nicely matches the expected content based on the prefix Zodiac provided, “My name is”, supporting the validity of the solution. The full message therefore reads
“My name is __ Slaves’ Slayer”.
More precisely, an exact solution to Z13 initially could not be found, even when allowing for one or two pad letters and an arbitrary transposition value j. But allowing in addition for one letter swap, as anticipated from Z340, yielded a single high-probability hit, “slaevseslayer”, obtained for j=-3 (i.e. necessitating transpositions of three steps left), as shown in Figure 12 below. An added pad letter was anticipated (to render w=13 a prime; indeed, |j|=3 would have failed with w=12), but not mid-sentence like the ‘e’ Zodiac introduced between “slaevs” and “slayer”; the resulting penalty somewhat raised the p-value. Nevertheless, p remained sufficiently small to statistically prove the solution correct beyond even a conservative threshold, and hence unique in general – not only in the constrained vocabulary.

Figure 12: Z13 solution. To read the message, start with the first symbol (black “A” encoding red ‘s’ on the left) and follow the blue transposition arrows.
Furthermore, the message turned out to be in some depth with respect to (i.e., partially reusing) the Z408 key, directly (K→s), with inversion (s→K), and with the more ambiguous generalizations (Greek and symbols; see Figure 12). Such substantial key reuse significantly exceeds what one would expect to occur by chance in such a short cipher, boosting the confidence in the solution. Tracing Zodiac’s steps, it appears that he initially avoided homophones altogether to render this short cipher solvable. But upon the third appearance of an ‘s’, in “Slayer”, Zodiac changed his mind, and instead of using A→s for the third time, he just took the K→s from Z408, as is. Interestingly, the depth of Z13 with respect to Z408 turned out to be sufficient to pick out the above solution uniquely even using the entire English dictionary, with no vocabulary constraints.
The sinister self-title “Slaves’ Slayer” closely matches what some of us anticipated, given Zodiac’s ramblings, and is consistent with his Z408 declaration, “I will not give you my name”. It is also consistent with his obsession with slaves. Note that Z408 and Z340 both mentioned slaves, so it is no surprise to see the word also emerge in Z13. Interestingly, the cipher in the 1990 Eureka card again invoked the word, using “Femme slave” to claim the murder of a female. Hence, we find that all homophonic and concealed ciphers identified as sent by Zodiac either provided bomb coordinates, or mentioned slaves. Importantly, with this Z13 solution, we finally understood what the SLA message was all about: once again, Zodiac provided the first word/s of his ciphers in plain sight, as a clue.
The main caveat in the Z13 solution appeared to be the misplaced padding letter. We could have initially been flexible about its position, but we were not, and the penalty we must thus impose on the p-value was not well defined. However, in a surprising turn of events, this misplaced pad letter in the 7th instead of 13th position ended up significantly strengthening the solution instead of weakening it. We already discussed the “sorry no cipher” note included in the Halloween envelope and its role as a wind mill reference, but the text conveys an additional message, consistent with Zodiac’s affinity to puzzle elements with multiple meanings. Indeed, the note raises several questions: Why did Zodiac repeat the same text twice? Why the awkward phrasing? Why is he sorry? Why suddenly address the absence of ciphers after ignoring it previously? Are the 13 text characters related to Z13, or is this just a coincidence? Why not a more symmetric intersection between sentences? And isn’t the ‘o’ at the intersection drawn strangely? All these questions are elegantly resolved when one realizes that Zodiac found an ingenious way to clarify that he placed a pad letter in the 7th symbol of his w=13 message Z13, then unsolved for six months and counting; see Figure 13 below.

Figure 13: The “sorry no cipher note” with its interpretation as a Z13 clue.
_____________
There are additional elements in Zodiac’s communications that might indirectly refer to the Vallejo Mill bomb, but it is impossible to determine if they are deliberate or just coincidental associations. For example, the Exorcist letter (the first canonical letter after Zodiac’s 1971-1974 hiatus, preceding the SLA and Citizen letters) included an excerpt of the ‘Tit Willow’ song from The Mikado. The song starts with “On a tree by a river”, which could perhaps hint at the bomb, hidden among trees on the road along Alameda Creek. More importantly, the song is followed by ‘There is beauty in the bellow of the blast’, which is the only bomb-like title out of at least 24 songs in The Mikado. Zodiac could have used ‘Tit Willow’ as a subtle reference for ‘the blast’; indeed, quoting directly from the ‘the blast’ would be too direct for his style.
There are clear examples of Zodiac using one puzzle element (like the aforementioned “sorry no cipher” note) to convey multiple separate meanings, elegantly and compactly. Hence, while the solutions summarized in this post account for all puzzle elements, we cannot rule out additional messages hidden as secondary meanings in these puzzles. For example, “LAKE TAHOE” in the Sierra postcard conveys (by initials) the letters “re” in the concealed cipher “Fremont NNE”, and may directly hint at Fremont (the lake being once called Lake Fremont, etc.), but one cannot exclude some third, sinister reference to the lake region. Such multiple meanings would not be unlike Zodiac, nor beyond his skills.
Are we sure that we identified all puzzles, and no ciphers remain concealed in the canonical Zodiac letters? It is impossible to entirely rule out hidden messages in an unstructured or long text (like any section of this post). Zodiac’s strange writing and multiple apparent mistakes are fertile grounds for planting a concealed message. For instance, the Little list letter contains deranged musings about afterlife slaves, followed by distorted lyrics of a version of the ‘As some day it may happen’ song from The Mikado. The letter includes, in addition to spelling mistakes and redundant letters, also a few full-blown gibberish words. Although alternatives such as misheard lyrics or private jokes seem more plausible, a concealed cipher could, in principle, hide here. The concealed cipher in the Sierra card is very noticeable and meant to have both key and message easily discovered. However, Zodiac’s puzzles were more challenging earlier in the correspondence, after Z408 was quickly solved, so well-concealed ciphers cannot be ruled out.
_____________
Did Zodiac actually plant and arm the bomb on Route 84, as he claimed? Most probably, yes. The repeated and increasingly transparent communications demonstrate a mounting pressure from Zodiac to identify the bomb location, so something sinister was surely hidden there. Zodiac discussed his bomb plans at length, detailing over time its target, components, first design, testing, and storage. He uncharacteristically and apparently honestly complained about the labor of digging for such a massive bomb and adjusting its trigger mechanism, and admitted the failure of his first model. Zodiac then provided his improved, second design, including a more suitable trigger mechanism, and made (ridiculous) demands before arming it. After his demands were not met, Zodiac indicated that the bomb was already armed and explained the delay in its triggering. Later, he went to the trouble of preparing Z32 as a clue for finding and disarming the bomb before a school bus triggers it in the Fall of 1970, and sent a subsequent clue (radians &#inches) to facilitate the Z32 solution. He didn’t give up at this point: months later, he provided the impressively thought-out network of interconnected Halloween puzzles, and before vanishing, sent the Sierra postcard after the bomb was already due to explode. Such deliberate, ongoing, demanding, focused, and even retroactive efforts indicate at a high probability that the bomb was indeed planted and armed, but luckily failed.
The preceding discussion shows how keen Zodiac was to have his audience solve his ciphers, identify the bomb location, and appreciate his abilities. (Despite bragging about being “crackproof”, he must have realized that generating an unsolvable cipher is trivial.) He prioritized giving clues to his past ciphers over new taunts, distractions, and other criminal content. He repeated the bomb location, first in cipher (April 1970), then in convoluted but redundant puzzles (October 1970), later in plain sight and in a concealed cipher (March 1971), and much later as the origin address of the Citizen card (May 1974). This escalation demonstrates an increasing pressure from Zodiac that we find the bomb. Even in the improbable case that Zodiac did not really plant a bomb on Route 84, he must have placed something sinister there; otherwise, he would not have repeated the same location in new obscure puzzles nobody could solve anyway. For example, he may have placed booby traps to harm those seeking the device. A 50-year-old explosive device can still impose some risk if tampered with. Any such device should be carefully removed, and its inner parts examined forensically: Zodiac presents as highly intelligent, but could not foresee the technological advances in forensic science.
The Sierra postcard provides the most precise bomb location, now limited only by paper measurement and scaling precision (ours and Zodiac’s). The repeated “Vallejo Mill” clues focus attention on the southwestern part of the Route 84 section entering Fremont, where the elevated wayside mentioned in the bomb design flattens out. This location precisely aligns with Paradise Drive, rendering the exact spot even more probable. This section of Route 84 seems untouched since the 1960s, so the bomb should still be there. Street view images show that the wayside, covered in vegetation only a decade ago, is gradually drying out and being eroded, so eventually, the bomb may be exposed naturally. Indeed, conspicuous structures are seen emanating from the wayside, such as two objects which seem to match the photoelectric switches in Zodiac’s design. However, additional structures can be seen on the wayside within the search box, and the localization of the bomb is not sufficiently precise to necessarily implicate these two objects.
_____________
Zodiac’s homophonic ciphers appear to be difficult not because he designed them cleverly, but rather because he made amateur mistakes and did not appreciate the exponentially enhanced difficulty of ciphers that have transposition irregularities, short lengths, or rare multiplicities. He thus presents as an amateur with no cryptographic, and certainly no cryptanalytic, training. Instead, he appears to be self-taught, and as such, very self-confident. Coming up with the interconnected puzzles above requires higher than average intelligence and creativity. Zodiac knew how to use natural polar coordinates (Z32), at least some words in Spanish (Halloween card), and probably the names of Greek letters (cipher key reuse). He may have taken an undergraduate course in math or physics, where he learned the above and perhaps some vector calculus (as inspiration for the VMF dots). Zodiac’s puzzles demonstrate careful planning and precise execution, with attention to details including letter shape, capitalization, etc. This precision lies in stark contrast to his sloppy plain letters, with their English mistakes and lack of structure. Hence, it appears that Zodiac deliberately introduced errors and disorganization to his plain letters.
Zodiac’s puzzles seem fine-tuned to be very difficult yet verifiable, in the sense that a correct solution to the entire puzzle structure, when presented, would be easily recognized as such. If Zodiac indeed managed to balance extreme difficulty and verifiability, as I claim, then this impressive calibration does not seem deliberate. Rather, he initially overestimated his audience, and then had to repeatedly provide clues to render his puzzles gradually easier and, eventually, solvable. It appears that he did not have much experience in teaching, or sharing puzzles with, adults; otherwise, he would probably have aimed lower.
The “sorry no cipher” and SLA messages, specifically aimed to facilitate a solution to Z13, suggest that Zodiac was eager to advertise himself as the (deranged, humoristic, or copycat) “Slaves’ Slayer”. He may have repeated this rare phrase elsewhere, thus associating himself with other putative communications. Given his obsessive behavior, additional correspondences and concealed ciphers should be anticipated: I only know of the Eureka card as a non-canonical communication that is clearly associated with Zodiac, but who knows how many letters were missed. Distinctive expressions used by Zodiac, such as unusual phrases, gibberish words, and repeated mistakes, could give him away if spotted in archived texts cross-referenced against his profile.
_____________
If you have read this post until the end and remain unconvinced, then I would be curious to know why; so far, my posts in this forum have not seen any real challenge (nor much support). It is usually straightforward to point out flaws in an incorrect or low-confidence solution (I criticize the work of others when explicitly asked to do so). Surely, some glaring caveat can be spotted if the above simple theory, accounting for so many communications, is incorrect – right? (Note that invoking an alternative interpretation does not challenge a theory that is stronger in scope, statistical significance, elegance, etc.) In any case, as some day it may happen that a bomb must be found, I’ve got a little wager: emerge it will, in Vallejo Mill, by Fremont police or nature.
Addendum: Concealed alphabet ciphers in non-canonical Zodiac communications
Concealed shifted-alphabet ciphers have been used behind the scenes of historical events for centuries, including espionage as late as (at least) the 1960s. Introductory texts cover both homophonic ciphers and such alphabet ciphers, so it is no surprise that Zodiac used not only the former, but also the latter. Indeed, after identifying the concealed cipher in the Sierra postcard, two additional concealed ciphers were found in cards previously flagged but not confirmed as sent by Zodiac. Despite their non-confirmed status, both cards deserve a discussion here, as their content and properties are relevant to the above analysis. Similarities between these two cards and the Sierra postcard authenticate all three communications, establish their solutions, and may identify other putative concealed ciphers.
Both cards are significant on their own accord. Henceforth denoted ‘Thirteen’, the first card predates the Sierra card (henceforth Sierra) and contains a rather messy cipher with the message “Vallejo Mill north”. As the first of many attempts by Zodiac to facilitate the Z32 solution and pinpoint the Fremont bomb, Thirteen predates even the Halloween card. Henceforth denoted ‘Eureka’, the latter card was sent much later, in December 1990, containing a cipher technically very similar to Sierra but more refined, with the unrelated message “Femme slave”. Eureka indicates that Zodiac was still alive and killing as late as 1990; among other implications, this card exonerates several suspects and suggests that Zodiac may have been responsible for the 1990 murder of Lona Robertson. Both ciphers further demonstrate Zodiac’s repetitiveness. Overall, his four homophonic and three alphabet ciphers have all discussed either slaves or the bomb location.
Like most classic alphabet ciphers, the messages in all three cards are encoded as the initials of words or sentences. All three ciphers use alphabet shifts s for a relative offset between cipher and message alphabets. These ciphers share unique technical similarities, including:
- Zodiac-style Riddles provide the values of s in all three cards.
- All three ciphers change the value of s (exactly) mid-sentence, triggered by a control.
- A fake body count number conceals this control in both Thirteen (13) and Sierra (12).
- All three messages contain word reversals – a recurring theme in Zodiac puzzles.
- Thirteen uses both regular (like Sierra) and inverted (like Eureka) alphabet mappings.
- Sierra and Eureka both contain a 10-letter message encoded with a 10-letter key offsetting individual letters.
- Sierra and Eureka both provide the key itself, thinly concealed within the communication.
- Sierra and Eureka both use the address on the envelope as part of the cipher, either for the key (Sierra) or the message (Eureka).
- Thirteen and Sierra both include upside-down text, read by clockwise rotating the card.
- Thirteen and Eureka both include an alphabet letter with a double meaning.
Several other attributes have already flagged the cards as possibly authored by Zodiac, including handwriting and riddle elements. When supplemented by the above unique characteristics common to the three concealed ciphers, and the bomb-related content of Thirteen and Sierra, all three cards can be attributed to Zodiac beyond any reasonable doubt. One even sees how Zodiac improved from Thirteen to Sierra to Eureka, gradually minimizing disorganized elements, letter swaps, etc. Note that unlike homophonic ciphers, solvable concealed shifted-alphabet ciphers are very difficult to create, especially when using keys as in Sierra and Eureka; Zodiac demonstrated considerable skill in designing and producing these cards.
Thirteen and Eureka are discussed below in this order, but you may want to start with the neater Eureka if you are unfamiliar with shifted alphabet ciphers. You may also wish to see the original Thirteen and Eureka derivations. There are also some clarifications RE Sierra at the end.
_____________
The ‘Thirteen’ card
The ‘Thirteen’ card (see figure below) was sent on October 5, 1970, after Z32 already went unsolved for three months, and three weeks before the Halloween card was sent with its multiple rebus puzzles for the bomb location. Unlike all earlier communications sent by Zodiac, here he used “S.F.” instead of “San Fran” in the address to hint at the importance of initials used in the concealed cipher. The presence of a concealed cipher is indicated by the awkward choice of words, their unnatural arrangement, alignment with controls (numbers and enumerable holes), irrelevant text (“You’ll hate me…”, “It Was Horrible”, etc.), an unusual date with a peculiar formatting, etc.
Thirteen holes were arranged in an irregular, deliberate pattern to indicate the alphabet shift s of each part of the message. The body count 13 was split by a comma into “1,3” to indicate its role as a concealed control changing the shift to s=3, in stark resemblance of Sierra. The Zodiac symbol and cross suggest quadrants, i.e., the message was split into four parts, with clockwise reading as in Sierra. The cross and comma demarcate the bottom quadrants. The upside-down text indicates that the postcard should be rotated for top, right, and bottom reading, again like Sierra.
Thirteen is more disorganized than the two other cards, and therefore more challenging to solve and prove unique. In particular, its three changes in s, necessitated by the absence of a key, are more challenging to track than the single s change in the two other cards, introducing some ambiguity. Thirteen includes coherent sentences, unlike the other cards, indicating that the cipher uses only the first initial of the sentence rather than all its word initials. For instance, “pass LAKE TAHOE areas” (in Sierra) is an unnatural sentence composed of different clippings, indicating that all word initials ‘PLTA’ are part of the cipher. In contrast, “Some of Them Fought” (in Thirteen) is coherent and taken from a single clipping, so only the ‘S’ is used.

The figure shows the postcard with red, cyan/blue, and green annotations corresponding to the three words in the cipher. Initials are identified as ordered cipher letters by colored numerals. The alphabet direction is indicated by heavy arrows, message reversal by dot arrows, and cipher letter reading direction by normal arrows (see legend); alphabet shifts are designated by mapping ‘a’ (with the corresponding s values in parenthesis). While the choice of initials, reading order, and s values are not entirely unique, they are reasonably well justified by the postcard structure and its control symbols. Notably, the ambiguity is quite restricted, and I could not find any other non-gibberish solution.
The cross splits the 13 holes such that the bottom part aligns with six holes (so |s|=6 for the green word), and the middle part aligns with the remaining seven holes (so |s|=7 for cyan letters). The top three lines were carefully aligned with three holes (so |s|=3 for the red word). The “1,3” control changes the shift s within the cyan/blue word (from s=7 for cyan to s=3 for blue). These choices, consistent with Zodiac puzzles, are neither arbitrary nor entirely unique. The initials are ordered naturally and not forced, except the red “R” and “H” on the bottom left, which, as shown below, are not essential for the message.
The red word, obtained from “RMHOODY” with s=-3 and a regular alphabet, is “ojellav”; word reversal gives “vallejo”. (As in Sierra, this word uses a regular alphabet, negative s, and message reversal). Without the red “R” and “H” on the bottom left, “MOODY” would yield “vallj”, which is not as good but still understandable. The cyan/blue word, obtained from “TFSI” with s=7 (cyan) or s=3 (blue) and a regular alphabet, is “mill”. The green word, obtained from “ZNPST” with s=6 and an inverted alphabet, is “htron”; word reversal gives “north”. (As in Eureka, this word uses an inverted alphabet, positive s, and message reversal). Combined, we have “Vallejo Mill north”.
To illustrate the mechanism in more detail, consider, for example, the green word. The Z in “Zodiac” yields both a ‘Z’ (viewed up) and an ‘N’ (viewed right – classic Zodiac trick), and along with “P.S. There” we obtain the cipher initials I=’ZNPST’. The shift s=6 (inferred from the six holes aligned with this part of the message, as indicated by the comma and cross) maps cipher letter ‘A’ onto message letter ‘g’. The alphabet is inverted, such that cipher ‘ABCD…’ is mapped onto message ‘gfed…’. Hence, ‘ZNPST’ is mapped onto ‘htron’, finally giving “north” after message reversal. There do not appear to be clues fixing the alphabet inversion, sign of s, and message reversal, so one needs to scan all eight options to solve the cipher. However, a five-letter word is sufficiently unique such that an eight-fold increase in message space yields only gibberish alternatives to “north”.
This cipher and its interpretation are not particularly elegant, but that was inevitable given the messy structure of the card (Zodiac did improve in later ciphers, using fewer s changes and better-ordered initials). However, the presence of the cipher is unmistakable, and a non-gibberish, consistent alternative to the above solution is highly improbable. By ‘consistent’, I mean s transitions that are motivated by the controls, and no more than three such transitions; the p-value remains very small after incorporating the three unspecified, binary degrees of freedom (alphabet inversion, sign of s, and word reversal).
_____________
The ‘Eureka’ card
The ‘Eureka’ card was sent from Eureka, CA in December 1990, 16 years after the last canonical Zodiac communication. In addition to an empty purchased card, the communication included only the address on a red envelope and a dark photocopy. The low-quality photocopy showed elements of a keychain with an elongated object and two keys, along with striation artifacts. Joint efforts by forum members identified the numbers K1=79408 and K2=58351 on the keys, and the keychain object as a magnet (like this one), with a phone number “70(7)-326…” written on top and “Buying…” on the side.
By controlling the key numbers, Zodiac was able to utilize the address initials on the envelope as the cipher message. However, while each key number encodes a five-letter word, the address contains only 4+5 words, as shown in the figure below. Zodiac created an additional initial by cleverly changing the ‘t’ in “Editor” into a plus sign, so its single initial ‘E’ became ‘EO’. Indeed, the ‘t’s in “Editor” and at the end of “Street” differ from all ‘t’s in other Zodiac letters. The message is thus encoded in the initials I1=“EOSFC” for K1 and I2=“MSSFC” for K2.

The first word, M1 encoded in initials I1, is straightforward: no non-trivial shift s is used, so no additional information is necessary. As in many classic ciphers, the alphabet is reversed in the sense that cipher letters “ABCD…” are mapped onto a message “azyx…”. The key is reversed, so I1 is shifted by +80497. Thus, the first cipher letter, i.e. the initial ‘E’ in “Edi+or”, is mapped onto the inverted alphabet ‘w’ and then shifted by the +8 key digit into ‘e’. The second letter, i.e. the initial ‘o’ after the plus sign, is mapped onto ‘m’ and (trivially) shifted by the +0 key to ‘m’, and so forth. The resulting message is “emmef”. Finally, Zodiac’s habitual word reversal gives “Femme”.
The second word, M2 encoded in I2, does use a shift s: like in Thirteen and Sierra, Zodiac changed s mid-sentence with a control, here encoded in the key chain and magnet. These clues are rather obscure, but are not strictly essential: the fixed key is sufficiently restrictive to admit a scan of all 26 alternatives for s without introducing much ambiguity. Nevertheless, we could have found s without such a scan had we realized that the chain contains 22 beads and the magnet (perhaps representing a compass needle) subtends a 22-degree angle with respect to the striations (see figure below), both hinting that s=22, such that cipher letter ‘A’ is mapped onto message letter ‘v’.

The alphabet is again inverted, so s=22 maps ‘ABCD…” onto ‘vuts…”. The key for this word is negated but not reversed, so we use -58351. Hence, the first cipher letter – the initial ‘M’ from “Mission” – is first mapped onto the inverted and shifted alphabet letter ‘j’, and then shifted by the first key digit -5 into ‘e’. The second letter – initial ‘S’ from “Street” – is first mapped onto ‘d’ and then shifted by -8 to ‘v’, and so forth. The resulting message is “evals”, reversed into “slave”.
Zodiac apparently left no clues for his binary choices of key reversal or negation, thus enlarging the possible message phase space by a factor of 4. He used an alphabet inversion and message reversal in both keys, but had we not guessed that, the phase space would have grown by a factor of 16 rather than 4. While this arbitrariness renders the solution more laborious, the fixed keys leave the p-value sufficiently small for a unique solution.
The entire message, “Femme slave”, is a Zodiac-style claim of a murdered female, as part of his afterlife-slaves theme mentioned also in Z408, Z340, and Z13. The card’s timing suggests a murder in December 1990, possibly late December according to previous Zodiac activity. (For example, he presumably called the house of Melvin Belli in late December 1969 and sent him a letter on December 20 of the year.) The phone number on the magnet suggests a Santa Rosa number, hinting at a murder in that region. So, was there a strange unsolved murder of a female near Santa Rosa in December 1990?
Yes, and SRPD cold murder cases appear to be rare. Lona Robertson (recent article – see slide 22, Video) was 32 years old when she was last seen alive, on December 20, 1990, getting into a car with someone she seemed to know. Her body was found on January 1, 1991, off Los Alamos road; she died of a gunshot wound to her head. Strangely, her purse was found thrown to the side of the rather distant Sonoma Mountain road on December 27, 1990. This murder is a significant match to Zodiac’s claim in terms of timing, location, circumstances, and absence of a suspect. (Note that a claim on the SRPD site that the victim disappeared on December 29 seems incorrect.)
_____________
The ‘Sierra’ card – additional details
The quoted expression “peek through the pines” was previously already suspected as an instruction to place the postcard hole over some other document. The Sierra analysis above confirms this interpretation, showing that the hole was meant to be aligned with (the true) magnetic north in the Mount Diablo map. Its role as an instruction supports the exclusion of “peek through the pines” as part of the concealed cipher in Sierra, removing more of the (already negligible) cipher ambiguity. Zodiac may have also meant the expression to indicate a search for the bomb among trees, as a double meaning often assigned to his puzzle pieces.
To illustrate the mechanism of this card in more detail, consider the last five cipher letters “CPLTA”, obtained as the initials of “Club 12 pass LAKE TAHOE areas”. These initials correspond to the last five letters of the key “paulaverly=chroniclke” in the attention line on the envelope. The shift in the last half of the message is s=1 (inferred from “12”, non-uniquely), so the relevant part of the key becomes “WFSMZ=iclke”. For the first of the five letters, as ‘W’ is mapped onto ‘i’ (i.e. twelve steps forward), the initial ‘C’ is mapped onto ‘o’. For the second letter, as ‘F’ is mapped onto ‘c’ (i.e. three steps backward), the initial ‘P’ is mapped onto ‘m’, and so forth; the full second word becomes “omerf”. The same mechanism for the first word with s=2 (also inferred from “12”, non-uniquely) converts “TISSC” into ‘enntn’, so the full message becomes “enntnomerf”. Finally, message reversal yields “Fremont NNE”. Even folding in all non-unique choices, the p-value remains negligibly small.